

Did you know Americans eat over 800 million frozen waffles a year? But nothing beats a homemade breakfast straight from the iron! Today, I’m excited to share our family’s favorite morning tradition with you.
I’ve tried many batches and happily ate them all. I’ve found an easy waffles recipe that works perfectly every time. Unlike most homemade waffles, these aren’t dense or eggy.
This breakfast treat is special because it’s both crispy and fluffy. You don’t need fancy tools or skills to make them.
I’ve made the recipe simple so you can make them before your coffee is ready. They’re perfect for weekend brunch or a random Tuesday treat.
Ready to make your mornings better? Let’s explore what makes these waffles the best start to your day!
Ingredients for the Perfect Waffle Batter
Creating homemade waffles starts with the right ingredients. Each one plays a key role in achieving that golden crunch and soft inside. Quality ingredients in the right mix make the magic happen.
Flour, Cornstarch, and Leavening Agents
The base of a great waffle recipe is the dry ingredients. I use all-purpose flour as the main ingredient. It gives the right structure without making waffles too dense.
Adding Cornstarch is my secret. It makes the outside crispy like restaurant waffles, while keeping the inside soft. It’s the secret to that perfect crackly crust.
For a great rise, I mix baking powder and baking soda. Baking soda works fast with acidic ingredients like buttermilk. Baking powder gives a second rise during cooking. And don’t forget the salt! It enhances all flavors and prevents waffles from tasting flat.
When measuring dry ingredients, use the spoon-and-level method. Spoon flour into your measuring cup and level it off with a knife. This avoids using too much flour, which can make waffles tough.
Buttermilk: The Secret to Fluffy Waffles
Restaurant waffles taste amazing because of buttermilk. It makes waffles light and fluffy. Buttermilk adds a tangy flavor and reacts with baking soda for extra lift.
If you don’t have buttermilk, make a substitute. Mix 2 tablespoons of lemon juice or white vinegar with regular milk to the 1-cup mark. Let it sit for 5 minutes until it thickens a bit.
Buttermilk’s magic is in its acid. It weakens gluten in flour, making waffles tender. Regular milk works too, but it won’t be the same.
Eggs, Oil, and Vanilla Extract for Richness and Flavor
The wet ingredients add richness, structure, and flavor to waffles. Eggs bind everything together and add richness. For light waffles, separate eggs and whip the egg whites before folding them into the batter.
I’ve tested both melted butter and vegetable oil. Oil makes the outside crispy and stays that way longer. If using butter, cool it slightly before adding to prevent cooking the eggs.
Don’t forget the vanilla extract. It adds depth that complements toppings well. Keep sugar low since toppings are usually sweet.
For best results, let refrigerated ingredients come to room temperature before mixing. Cold ingredients don’t mix well and can affect rising. This simple step improves batter smoothness and even cooking.
Waffle batter needs the perfect balance of ingredients for that crispy outside and fluffy inside. Careful measurements and quality ingredients will give you waffles that rival any restaurant.
Step-by-Step Guide to Making Waffles
Let’s dive into the step-by-step process that will transform basic ingredients into golden, crispy waffles. Making perfect waffles isn’t complicated, but each stage matters for that ideal texture and flavor. I’ll guide you through each critical step to ensure your breakfast is a delicious success.
Mixing the Dry Ingredients
The foundation of great waffles begins with properly mixed dry ingredients. Start by whisking together your flour, cornstarch, sugar, baking powder, baking soda, and salt in a large bowl. This step ensures even distribution of leavening agents and prevents any bitter spots in your waffles.
Always use a flat-topped measuring cup designed for dry ingredients rather than a liquid measuring cup. For perfect texture, combine 1 cup of all-purpose flour with ¼ cup of cornstarch using the spoon-and-level method.
When whisking, be thorough but gentle. You want to incorporate air without compacting the flour. I recommend using a large bowl for this step to give yourself plenty of room for when it’s time to add the wet ingredients.
Combining the Wet Ingredients
In a separate bowl, it’s time to bring your wet ingredients together. Start with the buttermilk, then add your melted butter or oil. Make sure the butter has cooled completely before adding it to prevent cooking the eggs prematurely.
Next, add your eggs. If you’re using whole eggs, simply add them now. If you’re trying the separated egg technique for extra fluffiness, add only the yolks at this stage. Finish with a teaspoon of vanilla extract for that classic flavor.
The temperature of your ingredients matters significantly. Room temperature eggs and buttermilk mix more evenly and prevent melted butter from solidifying into small pieces. This attention to detail creates a smoother waffle batter and more consistent texture.
When your wet mixture is ready, pour it into the bowl with your dry ingredients. Whisk just until combined – this is crucial! Overmixing develops gluten, making waffles tough instead of tender. Stop when small lumps remain in the batter; they’ll disappear during cooking.
Letting the Batter Rest for Optimal Results
One secret to exceptional waffles is patience. After mixing, let your waffle batter rest for 15-30 minutes before cooking. This simple step makes a remarkable difference in your final results.
During this resting period, several important processes occur. The flour fully hydrates, any small lumps dissolve naturally, and the gluten strands relax. This prevents your waffles from becoming tough or chewy.
Your leavening agents also begin creating bubbles that will expand during cooking, resulting in lighter, fluffier waffles. You’ll notice the batter thickens slightly during this rest – that’s exactly what you want!
While waiting, use this time to prepare toppings, set the table, or preheat your waffle iron. Even a 10-minute rest improves texture, but I find 20-30 minutes delivers the best results.
Preheating and Greasing the Waffle Iron
While your batter rests, focus on preheating your waffle iron thoroughly. A properly heated iron is essential for achieving that perfect crispy exterior. Most waffle makers have an indicator light showing when they’re ready, but I give mine an extra minute beyond that point.
To test if your iron is hot enough, sprinkle a few drops of water on the surface. They should sizzle and evaporate almost immediately. This ensures your waffles will start cooking the moment the batter hits the iron.
Whether to grease your iron depends on your specific model. Many modern waffle makers have non-stick surfaces that work perfectly without additional greasing. However, if your waffles tend to stick or you want an extra-crispy exterior, apply a light coating of cooking spray or brushed vegetable oil.
When everything is ready, pour the batter into the center of your iron. Use enough to spread nearly to the edges – typically ½ to ¾ cup for a standard waffle. Close the lid gently and resist peeking until the steam significantly slows down. Most waffle irons take 4-6 minutes to cook the waffles perfectly.
| Waffle Iron Type | Preheat Time | Cooking Time | Batter Amount | Best For |
|---|---|---|---|---|
| Standard American | 5-7 minutes | 4-5 minutes | ½ cup | Everyday breakfast |
| Belgian | 7-10 minutes | 5-6 minutes | ¾ cup | Deep pockets for toppings |
| Cast Iron | 8-10 minutes | 3-4 minutes per side | ⅓ cup | Extra crispy exterior |
| Mini Waffle | 3-5 minutes | 2-3 minutes | ¼ cup | Kid-friendly portions |

Tips for Achieving Crispy, Golden-Brown Waffles
After years of making waffles, I found some foolproof tips. These tips will make your breakfast amazing.
First, never stack your waffles. This mistake makes them soggy fast. Instead, put each waffle on a baking sheet in a 200°F oven while cooking more.
Use high heat on your waffle iron. This creates a crispy outside and a fluffy inside. The outside gets golden while the inside stays moist.
Adding 1-2 tablespoons of cornstarch to your batter makes waffles extra crispy. This small change makes a big difference in texture.
For fluffier waffles, separate your eggs. Whip the whites and fold them in last. This adds air bubbles that make waffles light and crispy.
Be patient when making waffles. Don’t open your waffle iron too soon. Wait until the steam drops a lot to know it’s almost done.
The color of your waffle is important. It should be golden brown, not pale. A darker color means better flavor and texture.
| Waffle Type | Cooking Time | Characteristics | Best For |
|---|---|---|---|
| American Waffle | 3-4 minutes | Thinner with smaller squares | Quick breakfasts, lighter toppings |
| Belgian Waffle | 4-6 minutes | Deeper pockets, thicker | Hearty breakfasts, holding more toppings |
| Liège Waffle | 4-5 minutes | Contains pearl sugar, caramelizes while cooking | Eating plain or with minimal toppings |
For an American waffle recipe, cook for 3-4 minutes. Belgian waffles need 4-6 minutes for deep pockets. This extra time helps the batter develop a crispy exterior.
To keep waffles warm and crispy, use a 200°F oven. Arrange them in a single layer on a baking sheet. This keeps them hot and crispy for everyone.
Make sure your waffle iron is hot before cooking. A hot iron gives a quick sear for crispiness. Let it heat for at least 5 minutes before cooking.
With these tips, you’ll make waffles like a pro. They’ll be crispy and delicious. These techniques work with any waffle recipe you love.
Delicious Topping Ideas for Your Homemade Waffles
Your homemade waffles are a blank canvas waiting to be adorned with an array of mouthwatering toppings. Making waffles at home lets you customize them exactly to your taste. Whether you prefer sweet classics, fresh and fruity options, or unexpected savory combinations, there’s a topping style for every palate and occasion.
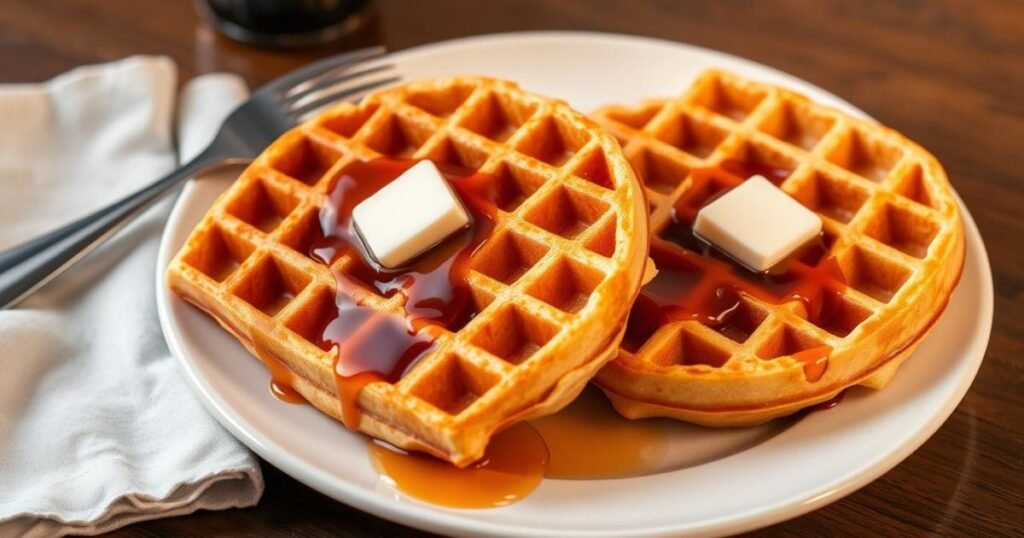
Classic Butter and Maple Syrup
Melted butter and real maple syrup on a freshly made waffle is magical. This timeless combination creates a balance of rich, sweet flavors that complement the subtle vanilla notes in your waffle batter.
For the best experience, warm your maple syrup before serving. Just 20 seconds in the microwave or a quick heat in a small saucepan makes all the difference. Cold syrup can quickly cool your waffles, robbing them of that wonderful crispy texture you worked so hard to achieve.The quality of your maple syrup matters tremendously. Real maple syrup (not pancake syrup, which is mostly corn syrup with artificial flavoring) offers complex flavor notes that elevate your breakfast experience. It might cost more, but the authentic taste is worth every penny.
Try these simple upgrades to the classic approach:
- Create compound butter by mixing softened butter with cinnamon, orange zest, or a drizzle of honey
- Warm your maple syrup with a cinnamon stick for a spiced variation
- For adult brunches, add a splash of bourbon to your warmed maple syrup
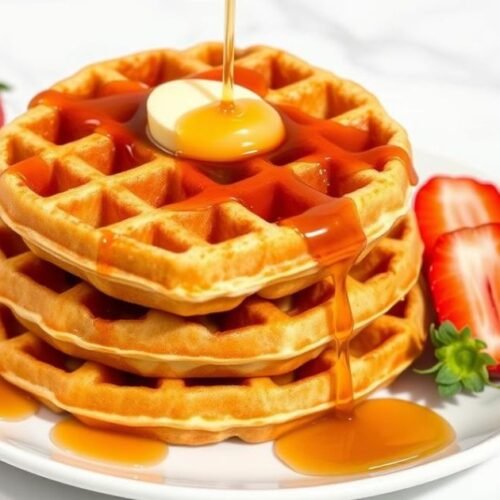
Fresh Fruit and Whipped Cream
Fresh fruit turns ordinary waffles into vibrant, nutritious meals. I love creating seasonal fruit toppings based on what’s available at my local market.
Summer offers the perfect opportunity to showcase berries in all their glory. Strawberries, blueberries, raspberries, and blackberries add bright color, natural sweetness, and juicy contrast to crispy waffles. For fall and winter breakfasts, try sautéed apples or pears with cinnamon for a warm, comforting topping.
Bananas work wonderfully year-round and develop amazing flavor when you give them a quick sear in a hot pan with a touch of butter and brown sugar. This simple step transforms an everyday fruit into a caramelized delight.
To elevate your fresh fruit toppings, try making a quick fruit sauce:
- Simmer berries with a splash of water and sugar until they break down into a vibrant sauce
- Reduce orange juice with a bit of sugar and orange zest for a citrusy option
- Blend frozen fruit with a touch of honey for an instant fruit coulis
Homemade whipped cream is the perfect partner to fresh fruit on waffles. It takes just minutes to make and tastes infinitely better than store-bought versions. Simply whip heavy cream with a touch of vanilla and sugar until soft peaks form. For a lighter option that still feels indulgent, try Greek yogurt sweetened with a drizzle of honey.
When I’m making my waffle recipe for 2, I often create individual topping combinations based on our preferences. This personalized approach makes breakfast feel special without requiring much extra effort.
Savory Toppings for a Twist on Breakfast
Savory waffles offer a delicious alternative perfect for brunch or even dinner. To transform your waffle recipe for 2 into a savory meal, simply reduce the sugar to just a teaspoon and consider adding herbs, cheese, or spices to the batter.
The savory topping possibilities are truly endless. Here are some of my favorite combinations:
- Crispy bacon or ham with a perfectly fried egg on top (the runny yolk creates a natural sauce)
- Mashed avocado with lime juice, salt, and red pepper flakes
- Pulled chicken or pork with a dollop of sour cream and green onions
- Smoked salmon with cream cheese, capers, and fresh dill
- Roasted vegetables with balsamic glaze and crumbled goat cheese
Savory waffles work beautifully as the base for countless flavor combinations, much like an open-faced sandwich. This approach is especially useful when cooking for just two people, as you can easily customize each portion to individual preferences.
I find that savory waffles are perfect for using up leftovers in a creative way. That roasted chicken from yesterday? Shred it and pile it on a waffle with some gravy. Leftover chili? Warm it up and serve it over waffles with a sprinkle of cheese and green onions.
The contrast between the crispy waffle exterior and these hearty toppings creates a satisfying meal that works for any time of day. Don’t be afraid to experiment with your favorite savory flavors – waffles are much more versatile than many people realize!
Storing and Reheating Leftover Waffles
Homemade waffles are great because they keep well for later. I often make a double batch for quick breakfasts all week. With the right storage and reheating, your waffles stay crispy and fluffy for days.
Refrigerating and Freezing Waffles for Later
Keeping waffles fresh is all about proper storage. First, let them cool down completely. This stops them from getting soggy later.
For short-term, store cooled waffles in an airtight container in the fridge. Stack them with parchment paper in between to avoid sticking. They stay fresh for up to 5 days.
For longer storage, freezing is the perfect solution. Here’s how to freeze waffles:
- Let waffles cool completely to room temperature
- Arrange them in a single layer on a baking sheet
- Freeze for about 2 hours until solid
- Transfer to freezer-safe bags
- Remove air before sealing
- Label the bags with the date
Flash-freezing on a baking sheet prevents sticking. This way, you can grab one or two waffles easily. Frozen waffles stay good for up to 3 months.
To prevent freezer burn, wrap each waffle in plastic wrap before freezing. This keeps texture and flavor fresh, perfect for busy mornings.
Reheating Techniques for Crispy Results
Homemade waffles are all about that crispy outside and fluffy inside. Reheating is key to getting that perfect texture. I’ve tried many methods and found the best ones.
The toaster or toaster oven is best for single servings. Just pop in refrigerated or frozen waffles on a medium-high setting. Frozen ones might need a second cycle for full crispiness.
For reheating many waffles, use your oven. Preheat to 350°F and place waffles on the rack. Refrigerated ones take 5-7 minutes, while frozen ones need 8-10 minutes.
Using a baking sheet is okay, but oven racks give better crispiness. The direct heat crisps the outside while warming the inside.
| Reheating Method | Best For | Time (Refrigerated) | Time (Frozen) | Crispness Level |
|---|---|---|---|---|
| Toaster | 1-2 waffles | 1-2 minutes | 2-3 minutes | Excellent |
| Toaster Oven | 2-4 waffles | 3-4 minutes | 5-6 minutes | Excellent |
| Conventional Oven | Multiple waffles | 5-7 minutes | 8-10 minutes | Very Good |
| Microwave | Emergency only | 15-30 seconds | 45-60 seconds | Poor |
Avoid the microwave if you can. It makes waffles soggy. If you must, microwave for 15-30 seconds and then crisp them in a toaster.
For a special touch, brush reheated waffles with melted butter. This adds fresh flavor and moisture.
With these tips, you can enjoy homemade waffle quality even on busy mornings. Freezing and quick reheating make this recipe great for meal planning and reducing waste.
Conclusion
Making perfect waffles at home is easier than you might think! Just a few pantry staples and a good waffle maker are all you need. You can make breakfast magic that rivals any brunch spot.
The secret is in the details. Cornstarch for crispiness, buttermilk for tenderness, and resting time for the batter. These tips make all the difference.
This waffles recipe is special because it’s flexible. Add chocolate chips, blueberries, or even herbs and cheese. Your waffle maker turns simple ingredients into golden, crispy pockets.
Remember, don’t overmix, preheat your waffle maker well, and keep waffles warm in the oven. These small steps make a big difference.
Whether for a special weekend breakfast or busy mornings, this recipe is perfect. You can even freeze extras and reheat them later.
So, plug in your waffle maker, make some batter, and enjoy homemade waffle perfection. Your breakfast table will never be the same!
FAQ – Waffle
Can I make waffle batter ahead of time?
Yes! You can make waffle batter up to 24 hours in advance. Store it in the fridge, covered. This makes the batter better as it hydrates the flour.
Just stir it gently before using. If it’s too thick, add a bit of milk to thin it out.
Why are my waffles not crispy?
Several things can make waffles not crispy. First, make sure your waffle iron is hot. Use high heat and add cornstarch to the batter.
Never stack waffles on top of each other. This traps steam and makes them soggy. Instead, place them in a single layer in a 200°F oven.
Can I substitute the buttermilk in this recipe?
Absolutely! You can make buttermilk by mixing 1 tablespoon of lemon juice or vinegar with regular milk. Let it sit for 5 minutes until it thickens a bit.
You can also use plain yogurt thinned with a little milk as a substitute.
How do I know when my waffles are done cooking?
Waffles are done when the steam from the iron decreases a lot. They should be golden brown, not pale. American-style waffles take 3-4 minutes, while Belgian waffles take 4-6 minutes.
Don’t open the iron too early. This can cause the waffle to split.
What’s the best way to freeze waffles?
Cool waffles completely, then freeze them in a single layer on a baking sheet for 2 hours. Transfer them to a freezer-safe bag, removing air before sealing. Label with the date. Frozen waffles stay good for up to 3 months.
Can I make this recipe without a waffle iron?
Unfortunately, you really need a waffle iron to make waffles. It creates the grid pattern and provides the heat for a crispy exterior. If you don’t have one, you can make pancakes instead.
How do I make my waffles extra fluffy?
For fluffier waffles, separate your eggs and beat the whites until soft peaks form. Then, gently fold them into the batter. This adds air pockets that make the waffles light.
Also, use fresh baking powder and baking soda for the best leavening.
What’s the difference between Belgian waffles and regular waffles?
Belgian waffles are thicker with deeper pockets. American-style waffles are thinner with smaller squares. Belgian waffles often use yeast and whipped egg whites for extra fluffiness.
They take longer to cook because of their thickness.
Can I make this waffle recipe for 2 people?
Yes! You can halve the recipe for two people. Use half an egg and halve all other ingredients. Or, make the full batch and freeze the extras for later.
Why does my waffle batter have lumps? Is that okay?
Small lumps in waffle batter are okay! They mean you haven’t overmixed, which would make the waffles tough. Stop mixing when you see small lumps. They’ll cook out during baking.
The batter should be thick but still pourable, like thick pancake batter.
Easy Homemade Waffles Recipe
Ingredients
- 1 cup all-purpose flour
- ¼ cup cornstarch
- 1 tablespoon sugar
- 1 tablespoon baking powder
- 1 teaspoon baking soda
- ½ teaspoon salt
- 1 cup buttermilk
- ¼ cup melted butter or vegetable oil
- 2 large eggs separate whites if fluffier waffles are desired
- 1 teaspoon vanilla extract
Instructions
- Mix Dry Ingredients: In a large bowl, whisk together flour, cornstarch, sugar, baking powder, baking soda, and salt.
- Combine Wet Ingredients: In a separate bowl, mix the buttermilk, melted butter or oil, eggs (yolks only if separating for fluffiness), and vanilla extract.
- Combine Wet and Dry Ingredients: Pour the wet ingredients into the dry and whisk gently until just combined. Be careful not to overmix.
- Let the Batter Rest: Let the batter rest for 15-30 minutes. This helps improve texture and fluffiness.
- Preheat and Grease Waffle Iron: Preheat your waffle iron, and grease it lightly if necessary.
- Cook the Waffles: Pour ½ to ¾ cup of batter into the preheated waffle iron, close the lid, and cook for 4-6 minutes until golden brown and crispy.
- Serve: Serve the waffles hot with your favorite toppings.
Notes
- Cornstarch for Crispiness: Adding cornstarch to the batter is key for getting that crispy exterior.
- Fluffier Waffles: To make waffles fluffier, separate the eggs and whip the whites before folding them in.
- Resting the Batter: Letting the batter rest for 15-30 minutes allows the flour to fully hydrate, resulting in fluffier waffles.
- Preheating the Waffle Iron: Make sure your waffle iron is preheated properly for the crispiest texture. Use the water-drop test to check the heat.
- Storing Leftovers: Leftover waffles can be stored in an airtight container in the fridge for up to 5 days or frozen for up to 3 months. For best texture, reheat them in a toaster or oven.
- Freezing Tip: When freezing waffles, flash-freeze them on a baking sheet before transferring them to a freezer-safe bag to avoid sticking.