


")
Did you know about 1 in 133 Americans has celiac disease? Many struggle to find tasty wheat-free bread. I found a great solution: a gluten free ciabatta recipe. It makes traditional Italian bread safe and delicious for those with dietary limits.
My adventure in wheat-free baking started with a love for making real artisan loaves. This yeast bread recipe is light and airy, just like the real thing. It shows that gluten-free bread can be just as good as the traditional kind.
Making the perfect gluten free ciabatta is more than just swapping wheat flour. It’s about mastering the art of bread making. I chose flours like oat, rice, and quinoa to create a recipe that’s true to ciabatta but safe for dietary needs.
Every slice of this bread is a story of culinary creativity. It has a crisp golden crust and a soft inside. This bread shows that you don’t have to give up flavor or fun, even with dietary restrictions. It’s perfect for those on a celiac diet or just trying wheat-free baking.
- Traditional Italian Ciabatta and Its Origins
- Essential Ingredients for Perfect Gluten Free Ciabatta
- Kitchen Tools and Equipment You’ll Need
- The Science Behind Gluten Free Ciabatta
- Step-by-Step Mixing and Proofing Process
- Shaping and Baking Techniques for Professional Results
- Achieving That Perfect Golden Crust and Airy Crumb
- Conclusion
Traditional Italian Ciabatta and Its Origins
The story of ciabatta is a fascinating journey through Italian culinary innovation. This classic italian bread emerged in the early 1980s. It changed the bread landscape with its unique characteristics and rich heritage.
The History Behind the “Slipper Bread”
In 1982, Arnaldo Cavallari revolutionized bread making in the Lake Como region of Italy. His creation, ciabatta, quickly spread across borders. By 1999, the recipe had been licensed to bakers in 11 countries, marking a significant milestone in bread history.
- Originated in Italy in 1982
- Introduced to the UK in 1985 by Marks & Spencer
- Brought to the United States in 1987 by Orlando Bakery
What Makes Authentic Ciabatta Special
Authentic ciabatta is a healthy bread with distinctive characteristics. It has an incredibly porous texture and a unique slipper-like shape. Regional variations show the bread’s versatility:
| Region | Ciabatta Characteristics |
|---|---|
| Lake Como | Crisp crust |
| Tuscany | Firm crust |
| Umbria | Firm crust |
| Marche | Firm crust |
Why Gluten Free Adaptation Matters
Creating an allergen-friendly version of ciabatta opens doors for those with dietary restrictions. By using alternative flour, bakers can now craft a vegan bread that maintains the essence of traditional ciabatta. The gluten-free adaptation allows everyone to enjoy this iconic italian bread, with recipes that can be prepared in under two hours.
- Whole-wheat version: Ciabatta integrale
- Milk-enhanced version: Ciabatta al latte
- Gluten-free adaptations continue to evolve
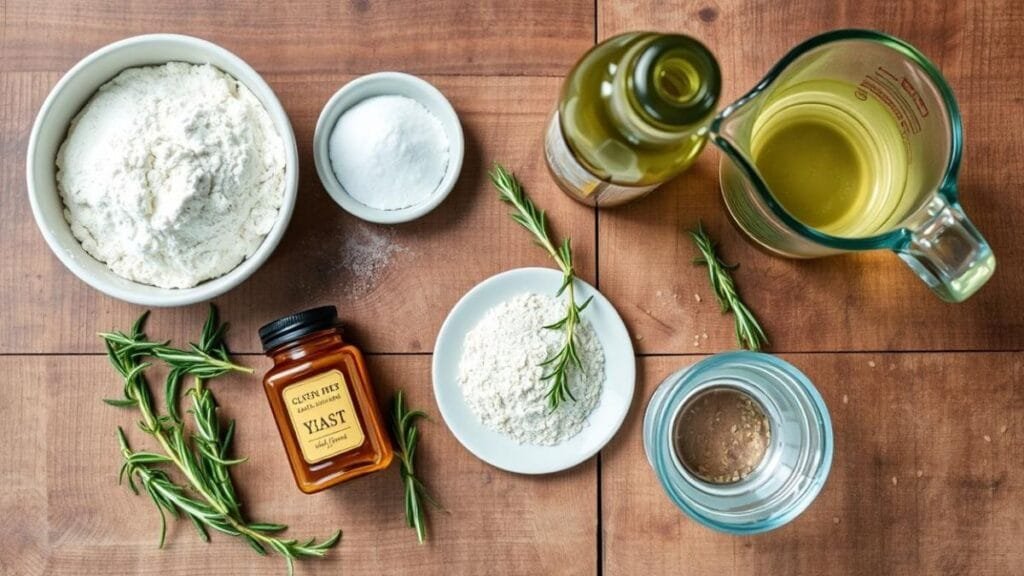
Essential Ingredients for Perfect Gluten Free Ciabatta
Making a great gluten free ciabatta bread needs the right flour mix. This mix should be healthy and tasty. I’ve learned that picking the right flours and ingredients is key for that ciabatta feel.
The base of a fantastic gluten free ciabatta is a special flour mix. Use a blend of flours that give structure and taste:
- Fine white rice flour (220g)
- Light sorghum flour (80g)
- Tapioca flour (120g)
- Potato starch for added lightness
Some ingredients are vital for gluten free bread:
- Psyllium husk powder (15g) – helps create elasticity
- Xanthan gum for texture improvement
- Instant yeast (7.5g)
- High-quality olive oil (40ml)
| Ingredient Category | Purpose in Gluten Free Ciabatta |
|---|---|
| Flour Blend | Provides structure and mimics gluten properties |
| Binding Agents | Replaces gluten’s elasticity and binding qualities |
| Liquid Ingredients | Ensures proper hydration and flavor |
The secret to a great gluten free ciabatta is knowing how each ingredient helps. Using the right amounts and quality ingredients turns flour into a healthy bread that’s just as good as the traditional kind.
Kitchen Tools and Equipment You’ll Need
Gluten free baking needs the right tools for success. My years of experience show that the right tools make a big difference. They help create perfect ciabatta bread.
Must-Have Mixing and Measuring Tools
When baking gluten free, precision is important. Here are the tools you need:
- A stand mixer with a dough hook attachment for consistent mixing
- Digital kitchen scale for accurate ingredient measurements
- Large mixing bowls with smooth surfaces
- Flexible dough scraper
- Instant-read thermometer
Baking Surfaces and Temperature Control
A baking stone is key for a professional ciabatta crust. It spreads heat evenly and makes the bottom crisp. Always preheat your stone for at least 45 minutes before baking.
Optional but Helpful Equipment
These tools can make your gluten free baking better:
- Proofing basket for shaping dough
- Silicone baking mats
- Spray bottle for creating steam in the oven
- Bench scraper for handling sticky dough
Quality equipment makes your home baking professional. It takes your gluten free baking to the next level.
The Science Behind Gluten Free Ciabatta
Making gluten free ciabatta needs a deep look into food science and new baking ways. I’m really into making bread without wheat, and I’ve found how ingredients work together. This makes bread safe for those with celiac disease.
It’s hard to make gluten free ciabatta because it lacks the protein network of regular bread. Gluten gives bread its stretch and strength. So, we use special flour mixes to replace it.
- Xanthan gum acts as a critical binding agent
- Psyllium husk provides structural support
- High hydration levels contribute to open crumb texture
It’s key to know how these flours work together to make a bread that’s both healthy and tastes like traditional ciabatta. We aim for a bread that’s light and airy, meeting both health and taste needs.
| Ingredient | Function | Impact on Texture |
|---|---|---|
| Xanthan Gum | Binding Agent | Increases Elasticity |
| Psyllium Husk | Structural Support | Improves Moisture Retention |
| Rice Flour | Base Alternative Flour | Provides Lightness |
By mixing these ingredients just right, bakers can make a gluten free ciabatta. It’s not just safe for those with celiac disease, but it’s also a great taste experience. The science of baking with alternative flours is always getting better, giving us tasty options for those on a celiac diet.
Step-by-Step Mixing and Proofing Process
Making the perfect gluten free yeast bread takes patience and care. The art of creating an artisan loaf starts with mixing and proofing the dough.
Creating the Perfect Dough Consistency
Gluten free baking needs a special way to mix the dough. Start with a dough that’s almost like a thick batter. Keep ingredients at room temperature and use wet hands to avoid sticking.
- Use a digital scale for precise ingredient measurements
- Mix ingredients until just combined
- Avoid over-mixing to prevent dense texture
First and Second Rise Techniques
The rise process is key for flavor and texture in your ciabatta. Multiple stretch and fold techniques help build structure in gluten free dough.
| Rise Stage | Duration | Temperature |
|---|---|---|
| First Rise | 30-45 minutes | 78-82°F |
| Second Rise | 30-60 minutes | Room temperature |
Handling High-Hydration Dough
Working with wet dough can be tricky. Use a flexible silicone spatula and keep your hands a bit damp. Gentle handling helps keep the air pockets that give ciabatta its texture.
Remember, practice makes perfect in gluten free baking. Each batch will teach you more about managing this delicate dough.
Shaping and Baking Techniques for Professional Results
Making perfect free ciabatta rolls needs a gentle touch and knowing the right techniques. I’ll show you how to shape your dough into artisan-quality bread.
Working with high-hydration gluten free ciabatta dough is all about precision. It needs special care to get those big air pockets and crispy outside.
- Use a well-floured surface for easy dough manipulation
- Handle dough gently to preserve air bubbles
- Avoid excessive pressing or kneading
- Allow natural spreading during proofing
Professional bakers don’t score ciabatta like other breads. Instead, let it spread naturally into its unique shape.
| Technique | Key Considerations |
|---|---|
| Dough Division | Create 4-inch square rolls or single loaf |
| Surface Preparation | Generously flour parchment paper or silicone mat |
| Baking Temperature | 450°F (220°C) for crispy crust |
For a golden crust and open crumb, follow my baking tips. Preheat your baking stone or sheet. Using steam can make it even crisper.
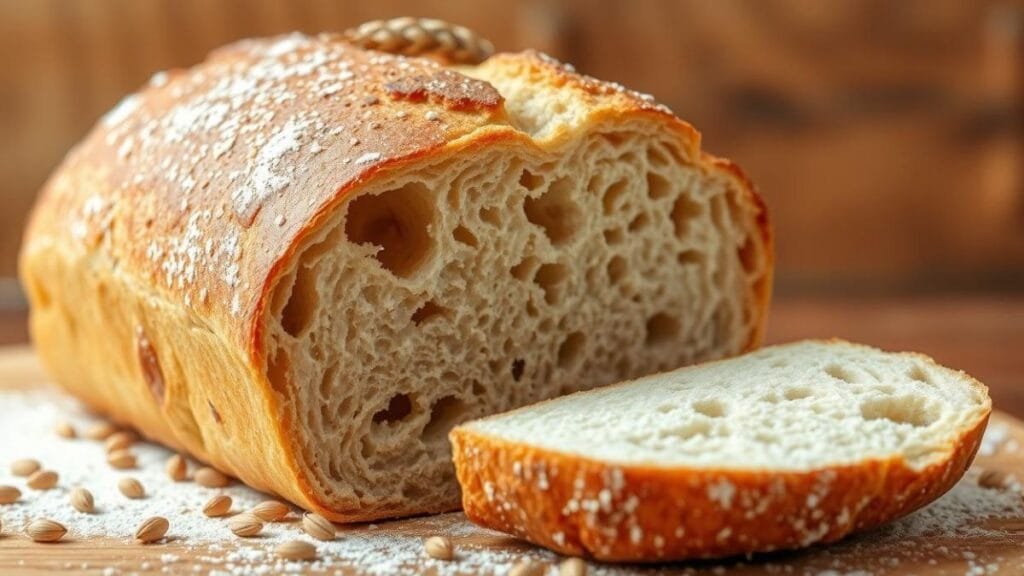
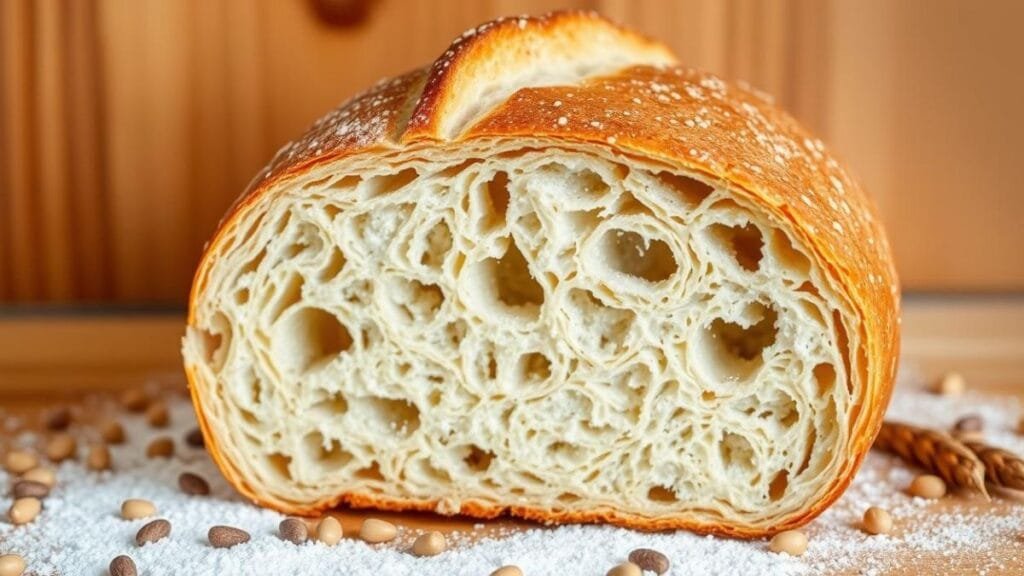
Achieving That Perfect Golden Crust and Airy Crumb
Making a great gluten free ciabatta is all about mastering a few key techniques. These steps turn a simple Italian bread into a masterpiece with amazing texture and look. To get it just right, you need to know the exact baking methods.
Temperature Control Secrets
To get that perfect golden crust, controlling the temperature is key. I always preheat my oven to 450°F. This high heat helps create a crisp, golden crust, just like the real Italian bread.
- Preheat oven to 450°F
- Use a baking stone for even heat distribution
- Position rack in the middle of the oven
Steam and Moisture Management
Steam is essential for the ciabatta’s crust. I put a metal pan with water on the bottom rack while baking. This adds moisture, making the crust crispy and golden while keeping the inside airy.
Testing for Doneness
To know if your loaf is done, look for a few signs. It should have a deep golden-brown crust and sound hollow when tapped. Use a digital thermometer to check the inside – it should be 210°F.
- Check crust color (deep golden brown)
- Tap bottom of bread for hollow sound
- Verify internal temperature reaches 210°F
Let the bread cool completely before slicing. This lets the crumb set right. Your homemade gluten free ciabatta will have a crispy crust and a light, airy inside.
Conclusion
Making gluten free ciabatta is more than a baking challenge. It’s a chance to make a classic Italian bread for those who can’t eat wheat. I’ve found that making the perfect gluten free ciabatta takes patience, precision, and creativity with different flours.
The secret to success is knowing what makes ciabatta special. Using rice flour, tapioca starch, and almond flour helps us make a bread that’s like the real thing but safe for those with celiac disease. I’ve learned that the right binders, like xanthan gum, can give it the same open crumb and crispy crust as traditional Italian bread.
Gluten free ciabatta is great for sandwiches, with soups, or just on its own with olive oil. It’s a tasty option for those who can’t eat wheat. Each loaf is a victory, turning dietary limits into a fun cooking adventure that celebrates taste, texture, and includes everyone.
Remember, getting good at making gluten free ciabatta takes time and practice. Don’t be afraid to try new things and enjoy the tasty results of your baking adventures.
Frequently Asked Questions
Is gluten-free ciabatta really possible to make at home?
Yes, it’s definitely possible! You just need gluten-free flour blends, xanthan gum, and psyllium husk. These ingredients help create a tasty gluten-free ciabatta. It’s all about knowing how to use these ingredients and the right techniques.
What flour blend works best for gluten-free ciabatta?
A mix of rice flour, oat flour, and quinoa flour is great. You can also try a commercial gluten-free bread flour blend. Finding the right mix will give you the perfect texture and taste.
How can I achieve the signature holes in gluten-free ciabatta?
To get that airy crumb, keep the dough wet (around 82% hydration). Use a stand mixer and do stretch-and-fold techniques during proofing. Xanthan gum and psyllium husk help with the dough’s elasticity, creating those holes.
Can I make this bread vegan?
Yes, it’s vegan-friendly. Use sunflower or avocado oil instead of butter. Replace dairy wash with plant-based milk for browning. Keep the same hydration and mixing methods as traditional ciabatta.
How long does gluten-free ciabatta stay fresh?
It’s best eaten within 2-3 days. Store it in an airtight container at room temperature. For longer storage, freeze it for up to a month. Slice before freezing and toast or warm it up to restore its texture.
What if my dough doesn’t rise properly?
Rising issues can be due to inactive yeast, cold temperatures, or the wrong flour. Make sure your yeast is fresh and use warm water. Proof the dough in a warm, draft-free area. A stand mixer can also help with air incorporation.
Is this bread suitable for people with celiac disease?
Yes, it’s safe for those with celiac disease or gluten sensitivities. Use certified gluten-free ingredients and avoid cross-contamination. Always check labels to ensure they are gluten-free.
Can I make ciabatta rolls instead of a full loaf?
Definitely! Divide the dough into smaller portions before the final rise. Ciabatta rolls are great for sandwiches, appetizers, or as a side. Just adjust the baking time for smaller sizes.


