


Did you know 95% of homemade marshmallow fans say their treats taste way better than store-bought ones? As a home baker with 8 years of making marshmallows, I’m thrilled to share my top chocolate marshmallow recipe. It turns simple ingredients into amazing sweet treats.
Making homemade marshmallows is more than cooking—it’s an art. My chocolate marshmallow recipe makes treats that are rich and indulgent. They will take your desserts to the next level. This method uses a special cocoa powder trick to get the best flavor and texture.
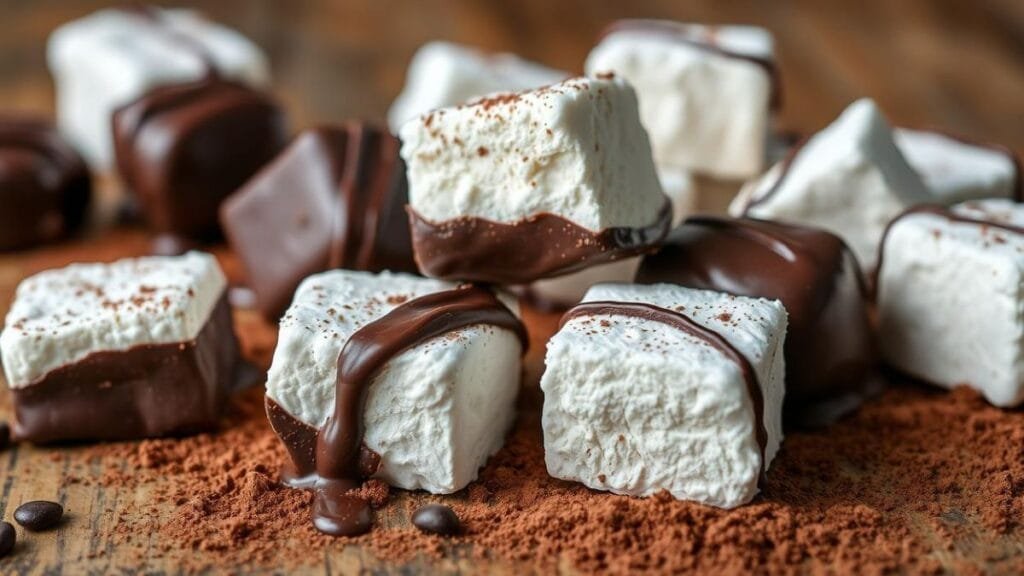
These marshmallows are easy to make, needing only 20-30 minutes of prep and 100% gluten-free ingredients. You’ll get 16 delicious 2-inch squares, great for gifts or with hot cocoa. Each bite is a deep chocolate delight that store-bought can’t match.
Get ready to learn the magic of making your own chocolate marshmallows. It’s a journey of cooking, creativity, and pure joy.
The Magic of Homemade Marshmallows
Exploring homemade chocolate marshmallows opens a world of culinary fun. These treats are more than just a dessert. As a seasoned baker, I’ve seen how homemade marshmallows change the game in baking.
Why Homemade Beats Store-Bought
Homemade chocolate marshmallows offer big benefits:
- Control over what goes into them
- Custom flavors
- Better texture
- No artificial additives
The Science Behind Marshmallow Making
Marshmallow magic comes from science. It’s about mixing sugar syrup with gelatin just right. This creates a fluffy, stable foam.
| Ingredient | Scientific Role |
|---|---|
| Gelatin | Creates protein network for structure |
| Sugar Syrup | Provides sweetness and helps stabilize foam |
| Cocoa Powder | Adds flavor and natural color |
Benefits of Making Your Own Marshmallows
My love for baking shows that making marshmallows is easy. With a few ingredients and tools, you can make a fancy dessert. It takes about 2 hours and 50 minutes, including prep and setting.
Homemade marshmallows are gluten-free, dairy-free, and sweetened with maple syrup. Each batch has 55 calories per serving. They’re a sweet treat for chocolate fans without the guilt.
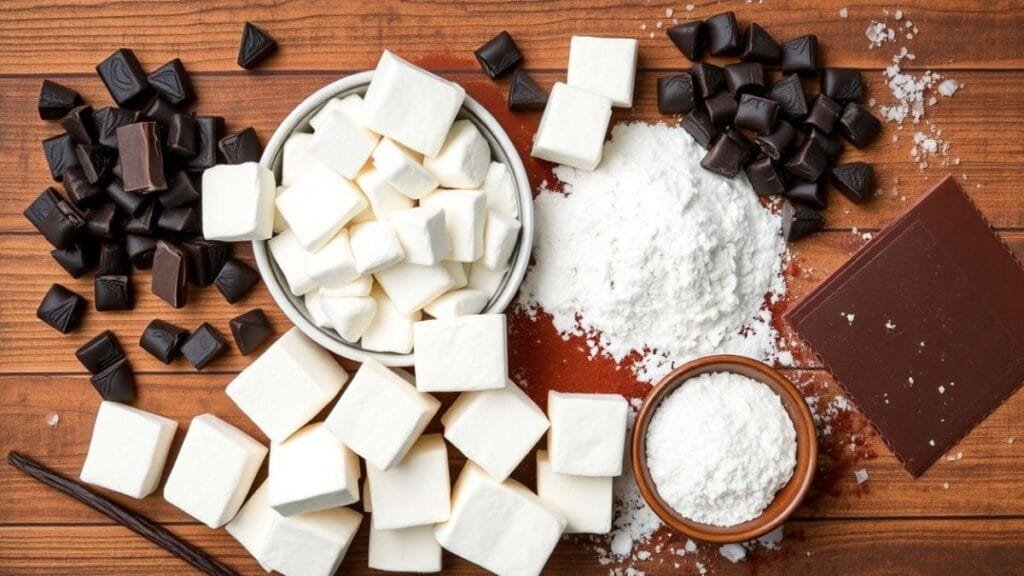
Essential Ingredients for Perfect Chocolate Marshmallow
To make the ultimate chocolate marshmallow, you need the right ingredients. I’ll show you what makes these treats so special.
Key Components and Their Culinary Roles
Great chocolate marshmallows start with knowing each ingredient’s role. Here’s what you need:
- Gelatin: Gives them structure and a smooth feel
- Cocoa powder: Adds deep chocolate taste
- Sugar syrup: Sweetens and holds everything together
- Corn syrup: Keeps them soft and shiny
Choosing the Right Cocoa Powder
Not all cocoa powders are the same. Dutch-process cocoa powder is best for a rich, smooth chocolate taste. Look for brands like Callebaut extra brute for the best flavor without bitterness.
Gelatin and Sugar Basics
Gelatin is key for marshmallows. It makes them light and fluffy. The right sugar mix ensures they’re just right.
| Ingredient | Quantity | Purpose |
|---|---|---|
| Granulated Sugar | 3/4 cup | Primary sweetener |
| Light Corn Syrup | 1/3 cup | Prevents sugar crystallization |
| Dutch-Process Cocoa Powder | 1/4 cup | Provides rich chocolate flavor |
| Powdered Gelatin | 2 1/2 tbsp | Creates marshmallow structure |
Knowing how these ingredients work together is essential. It’s what makes homemade chocolate marshmallows so amazing.
Required Equipment and Tools
To make tasty homemade chocolate marshmallows, you need the right kitchen tools. A candy thermometer is key for checking sugar syrup temperatures. This is vital for making marshmallows perfectly.
Choosing the right tools makes making marshmallows fun and easy. Here are my top picks:
- Stand mixer with whisk attachment for whipping egg whites and creating fluffy textures
- High-quality candy thermometer capable of reaching 250°F
- Small saucepan (1.5-2 quart size)
- 9×9″ square non-metal baking pan
- Offset spatula for even mixture spreading
- Sharp, clean knife for cutting marshmallows
- Pastry brush for managing sugar crystals
- Sifter for dusting cocoa-sugar mixture
When working with egg whites and sugar syrups, being precise is important. A stand mixer helps make marshmallows light and airy. The candy thermometer ensures you hit the perfect temperature for top-notch results.
| Tool | Purpose | Recommended Specification |
|---|---|---|
| Candy Thermometer | Temperature monitoring | 250°F maximum range |
| Stand Mixer | Whipping egg whites | Whisk attachment included |
| Saucepan | Sugar syrup preparation | 1.5-2 quart capacity |
Investing in these tools will change your marshmallow-making game. You’ll get consistent, top-quality results every time. The right tools are essential for making delicious chocolate marshmallows.
The Secret to Perfect Chocolate Flavor
Making top-notch chocolate marshmallows is all about mastering a few key techniques. My journey to perfect chocolate marshmallows showed me the importance of understanding how ingredients work together. This knowledge is key to creating a truly amazing treat.
Blooming the Dutch Process Cocoa Powder
The magic starts with blooming dutch process cocoa powder. This method involves gently soaking the cocoa powder to boost its rich chocolate taste. I mix the cocoa with hot syrup to make a smooth, flavorful base. This base will take your marshmallow experience to the next level.
- Sift cocoa powder to prevent lumps
- Use hot syrup at precisely 240°F
- Whisk gently to incorporate fully
Temperature Control Techniques
Getting the temperature just right is key to perfect marshmallow texture. The sugar mixture needs to hit exactly 240°F on a candy thermometer. This temperature is perfect for your chocolate marshmallows.
| Temperature Range | Result |
|---|---|
| Below 240°F | Marshmallows too soft |
| Above 250°F | Marshmallows become hard |
| 240°F – 245°F | Perfect marshmallow texture |
Achieving the Right Consistency
Getting the right consistency takes patience and careful whipping. Whipping the mixture for 12-14 minutes gets you marshmallows with the perfect texture. Start at medium-high speed, then go to high. Watch for the mixture to double in volume and form beautiful strings along the bowl’s sides.
- Whip for 6-8 minutes at medium-high speed
- Increase to high speed
- Continue whipping until mixture doubles
- Let set at room temperature for 4 hours
Pro tip: Always add cocoa powder slowly to keep the marshmallow’s air structure. This way, you’ll get chocolate marshmallows that are light, fluffy, and full of intense chocolate flavor.
Step-by-Step Preparation Process
Making homemade chocolate marshmallows needs care and patience. I’ll show you how to turn simple ingredients into a tasty treat.
- Gelatin Preparation Begin by sprinkling 3 packets of unflavored gelatin into cold water. Let it sit for about 5 minutes. This makes a smooth base for your marshmallows.
- Cocoa Mixture Next, mix hot water with unsweetened cocoa powder in a separate bowl. This step makes a rich chocolate base for your marshmallows.
- Sugar Syrup Creation Then, mix granulated sugar, corn syrup, and salt in a saucepan. Heat it to exactly 238 degrees Fahrenheit. Be careful to get the perfect consistency.
When mixing, slowly add the hot sugar syrup to the gelatin. This method ensures even mixing and prevents crystals.
| Ingredient | Quantity | Purpose |
|---|---|---|
| Unflavored Gelatin | 3 packets (21g) | Provides structure |
| Granulated Sugar | 2 1/3 cups (465g) | Sweetness and texture |
| Cocoa Powder | 1/2 cup (45g) | Chocolate flavor |
- Whipping Process Use a stand mixer to whip the mixture on high speed for 10-15 minutes. The marshmallow will become thick and fluffy.
- Setting and Finishing Pour the marshmallow mixture into a prepared pan. Dust with powdered sugar and cocoa powder. Let it set at room temperature for 8-10 hours.
After setting, cut your marshmallows into shapes and coat with sugar-cocoa mixture. Store them in an airtight container for up to a week. Enjoy your homemade chocolate marshmallows!
Storage and Serving Suggestions
Making chocolate marshmallows is an art. Knowing how to store and serve them makes it even better. My homemade marshmallows are great for hot chocolate or desserts.
Proper Storage Methods
After making your marshmallows, it’s important to store them right. Keep them in an airtight container at room temperature. Dusting with powdered sugar helps prevent sticking and adds sweetness.
- Use a container with a tight-fitting lid
- Keep away from direct sunlight and heat
- Separate layers with parchment paper
- Add a light coating of powdered sugar
Creative Serving Ideas
My chocolate marshmallows are great for many things. Adding vanilla extract can make their chocolate taste even better in desserts.
- Melt into hot chocolate for an indulgent drink
- Use as cake or cupcake decorations
- Create gourmet s’mores
- Top ice cream sundaes
- Gift in clear treat bags
Shelf Life Tips
Homemade chocolate marshmallows can last up to 3 weeks if stored right. Don’t refrigerate or freeze them, as it can ruin their soft texture. Always check for moisture or hardening before eating.
| Storage Location | Expected Shelf Life | Recommended Conditions |
|---|---|---|
| Room Temperature | 3 weeks | Airtight container, cool dry place |
| Refrigerator | Not recommended | Can cause texture changes |
| Freezer | Not recommended | Compromises marshmallow quality |
By following these tips, your homemade chocolate marshmallows will stay delicious for weeks.
Creative Variations and Flavor Combinations
Turning your homemade chocolate marshmallows into exciting flavors is simple. Just use a stand mixer and your imagination. You can make your hot cocoa’s best friend even better.
I’ve found amazing ways to spice up your chocolate marshmallows. They’ll make your taste buds happy:
- Mocha Magic: Add instant coffee granules to intensify the chocolate experience
- Spicy Mexican Hot Chocolate Style: Incorporate cinnamon and a pinch of cayenne pepper
- Chocolate Orange Twist: Mix in orange extract for a citrusy kick
- Peppermint Chocolate Delight: Blend in peppermint extract for a refreshing variation
Trying different cocoa powders can really change your marshmallows’ taste. Black cocoa gives a cool “edible coal” look, great for holidays.
| Flavor Variation | Key Ingredient | Recommended Pairing |
|---|---|---|
| Mocha Marshmallow | Instant Coffee | Espresso Hot Cocoa |
| Mexican Hot Chocolate | Cinnamon & Cayenne | Spiced Hot Cocoa |
| Chocolate Orange | Orange Extract | Dark Chocolate Hot Cocoa |
| Peppermint Chocolate | Peppermint Extract | Classic Hot Cocoa |
Pro tip: Use your stand mixer for smooth mixing of flavors. The fun is in trying new mixes and finding your favorite!

Conclusion
My adventure in making homemade marshmallows has been a joy. The chocolate marshmallow recipe I shared is more than a simple treat. It’s a chance to get creative in the kitchen.
With over 73,000 possible variations, these sweets open up endless possibilities. They are perfect for both home bakers and dessert lovers.
Making your own marshmallows lets you control every step. You can pick the best ingredients and adjust the flavors. This recipe lets you try different chocolates and sweetness levels.
It’s a great way to make unique treats. The U.S. gelatin-based method is a solid base for your creations.
Whether you’re new to baking or have lots of experience, making marshmallows is rewarding. It turns simple ingredients into amazing sweets. The process might take time, but the end result is worth it.
Each batch you make is a special creation. It’s a way to impress others or treat yourself. It’s a personal touch that makes your desserts stand out.
I invite you to dive into the world of homemade marshmallows. Try new flavors and enjoy the process of making your own treats. From classic to creative, there’s a whole world of marshmallows waiting for you to explore.
Chocolate Marshmallows FAQ
How long do homemade chocolate marshmallows last?
Homemade chocolate marshmallows can last up to 3 weeks in an airtight container at room temperature. Some people report they stay good for 6 weeks. Don’t refrigerate or freeze them to keep their best taste and texture.
Can I use different types of cocoa powder?
Yes, you can try different cocoa powders. Dutch-process cocoa, like Callebaut extra brute, has a deep flavor with less bitterness. Choose high-quality cocoa for the best taste. Black cocoa is great for making ‘edible coal’ marshmallows.
What equipment do I need to make chocolate marshmallows?
You’ll need a candy thermometer, a stand mixer with a whisk, a small saucepan, and a 9×9″ baking pan. Also, an offset spatula, a sharp knife, and a sifter for dusting. A pastry brush helps with sugar crystals.
How do I get the most intense chocolate flavor?
To get intense chocolate flavor, bloom the cocoa powder with boiling water. This makes a smooth paste and deepens the flavor. Adding instant coffee can make it even richer.
Can I make variations of chocolate marshmallows?
Absolutely! Try Mocha marshmallows, chocolate-dipped ones, or chocolate orange. You can also make Mexican hot chocolate or chocolate peppermint marshmallows. Experiment with different extracts and spices.
What are some ways to serve homemade chocolate marshmallows?
These marshmallows are great for many things. Use them in s’mores, in hot chocolate, or as ice cream toppings. They’re also perfect for decorating cakes. Package them in clear bags for gifts or cookie exchanges.
How do I know when the sugar syrup is at the right temperature?
Use a candy thermometer to check the sugar syrup. It should be between 245-250°F (hard ball stage). This temperature is key for the right marshmallow texture. Monitor it carefully during this step.
How long do I need to whip the marshmallow mixture?
Whip the mixture on medium-high for 3-4 minutes, then high speed. It takes about 6-8 minutes total. You want it to double in size and form strings on the bowl. This makes it fluffy and thick.


